Gingerbread Nails
For the 10th day of our 12-days of HONA countdown, we’re learning how to create this delicious Gingerbread look. This tutorial has been created by @@thats.handy using our new advent-calendar-exclusive shade, Gingerbread Detail Paint. Don't worry If you haven't got the advent calendar, you can still follow along with your closest reflective detail paint.
Watch The Tutorial
Application Guide
Video Transcript
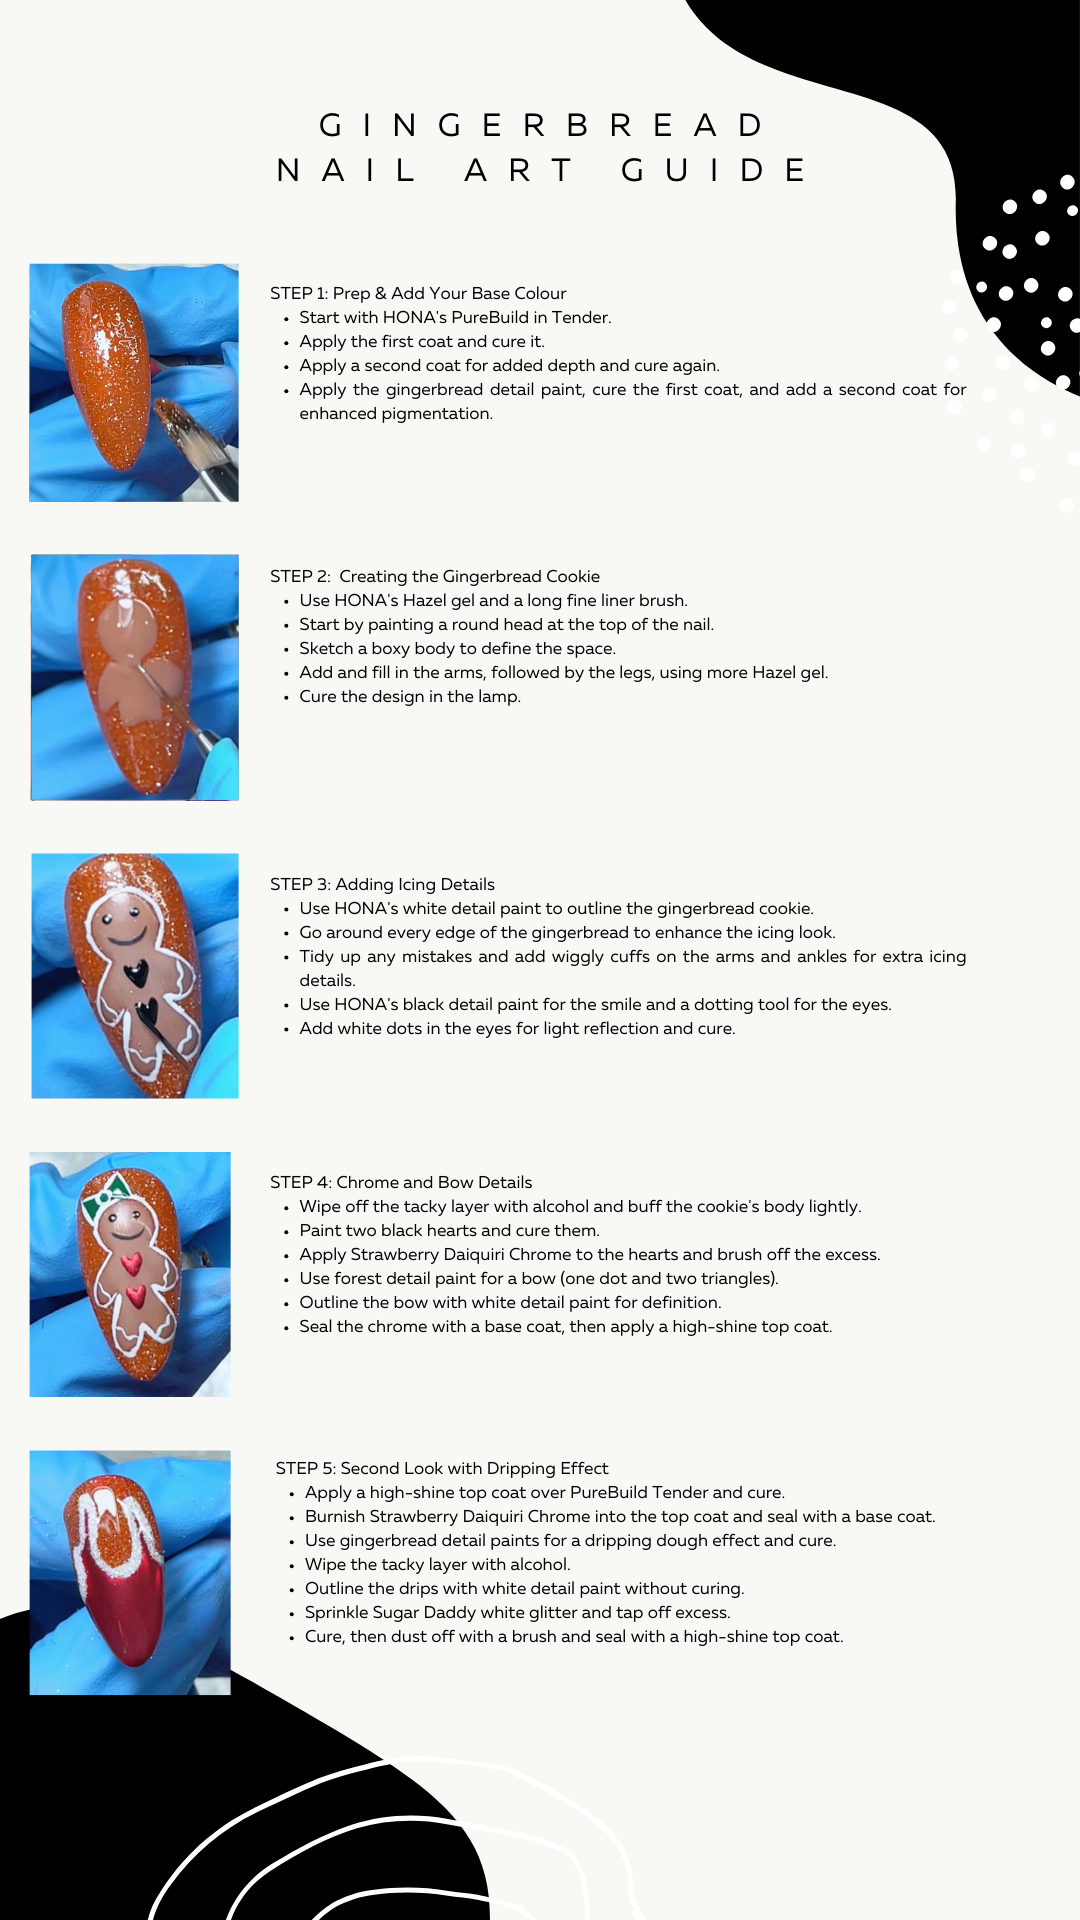
Hi everyone, join me to do the super cute, gingerbread nails. I'm starting off with PureBuild in Tender. This is my second go after my first cured coat. Then I'll cure this before reaching for my gingerbread ah this gorgeous new sparkle. It's such a beautiful warm tone. This is my first coat then I've cured it and I've added a second coat for extra pigmentation. I'm then going to take my Hazel gel and a long fine liner brush and start working on my cookie. Starting off with a round head here. As you can see, I'm making sure it's nice and circular up towards the top of the nail and then sketching out a little boxy body just so I know what space I want to cover adding one arm, then the other, filling those in with more Hazel. It's such a perfect shade for this gingerbread look that I'm going for and it really pops on top of the gingerbread sparkle. Then I'm finishing off adding her wee legs here and after this is finished, I will give it a cure in the lamp. that I'm taking my HONA White Detail Paint and outline in my cookie. Even though this Hazel really pops on top of the gingerbread sparkle. I really think that this helps to make the cookie stand out and gives it that really icing style feel to it. I'm going around every single edge of the gingerbread and here I'm tidying up my mistakes and then going to add some cute wiggly little cuffs on each arm and each ankle so that looks like extra icing details on the cookie. Now I'm going in with my black HONA detail paint to create a cute little smile. And using my HONA dotting tool for the eyes. I've cured this before adding two more little white dots as a light reflection. Now we're going to make some magic with this Strawberry Daiquiri Chrome. I'm wiping off the tacky layer here with some alcohol and I'm giving the body of the cookie a little bit of a buff before going in with my black detail paint. I'm then going to cure these two black detailed hearts in the lamp. Before I returned to my strawberry daiquiri Chrome and burnish it into that black detail paint really make that Chrome stick. Brush off the excess and we can see that the Chrome's only stayed where we want it to. I'm now going in with some forest detail paint to add a cute little bow. This is made up of one polka dot and two triangles I want to make this pop just like I made the gingerbread cookie prop so I'm going to outline this too with the homeowner white detail paint using my long line of brush still it's really great for details. I like to ceiling chrome with a base coat before I go in with my top coat just to make sure that it's nice and locked in. So I'm going in first with a base coat here. Then I'm finishing off with our gorgeous high-shine top coats look how cute she is. For our second look. I'm going straight in with a high-shine topcoat on top of the PureBuild Tender and curing that before burnishing in some more of that strawberry daiquiri Chrome and then sealing that in with a base coat. I would always do this on my client base coat before a top coat. Make sure you cap those free edges. After curing that, again, I'm using our gingerbread detail paints I'm creating these drip like effects as if it's sort of the dripping doh of the gingerbread. And I think this looks really really fun against the Red Chrome. And because I've cured a base coat, if I make a mistake on this, it's okay because I can wipe it off without ruining that Chrome. Then I will cure this before the next step. I'm going to give that tacky coat a wipe off with some alcohol again because I'm going to be using the sugar daddy loose glitter also from HONA everything's from home now. I'm going to use the white detail paint to outline those drips. And I'm not going to cure this okay, because I'm going to spring clean With my cuticle pusher, I'm going to sprinkle on that sugar daddy white glitter for just extra extra sparkle, tap off the excess before curing then dusting off the brush locking all that in with a SuperShine topcoat. Before we reveal this final luck isn't a gorgeous on my other nails. I've used shade Hazel again and then I've used the gold super shine top coat. How stunning is this cute? Gingerbread luck? I mean love