Anti Christmas Nails
Watch the Tutorial
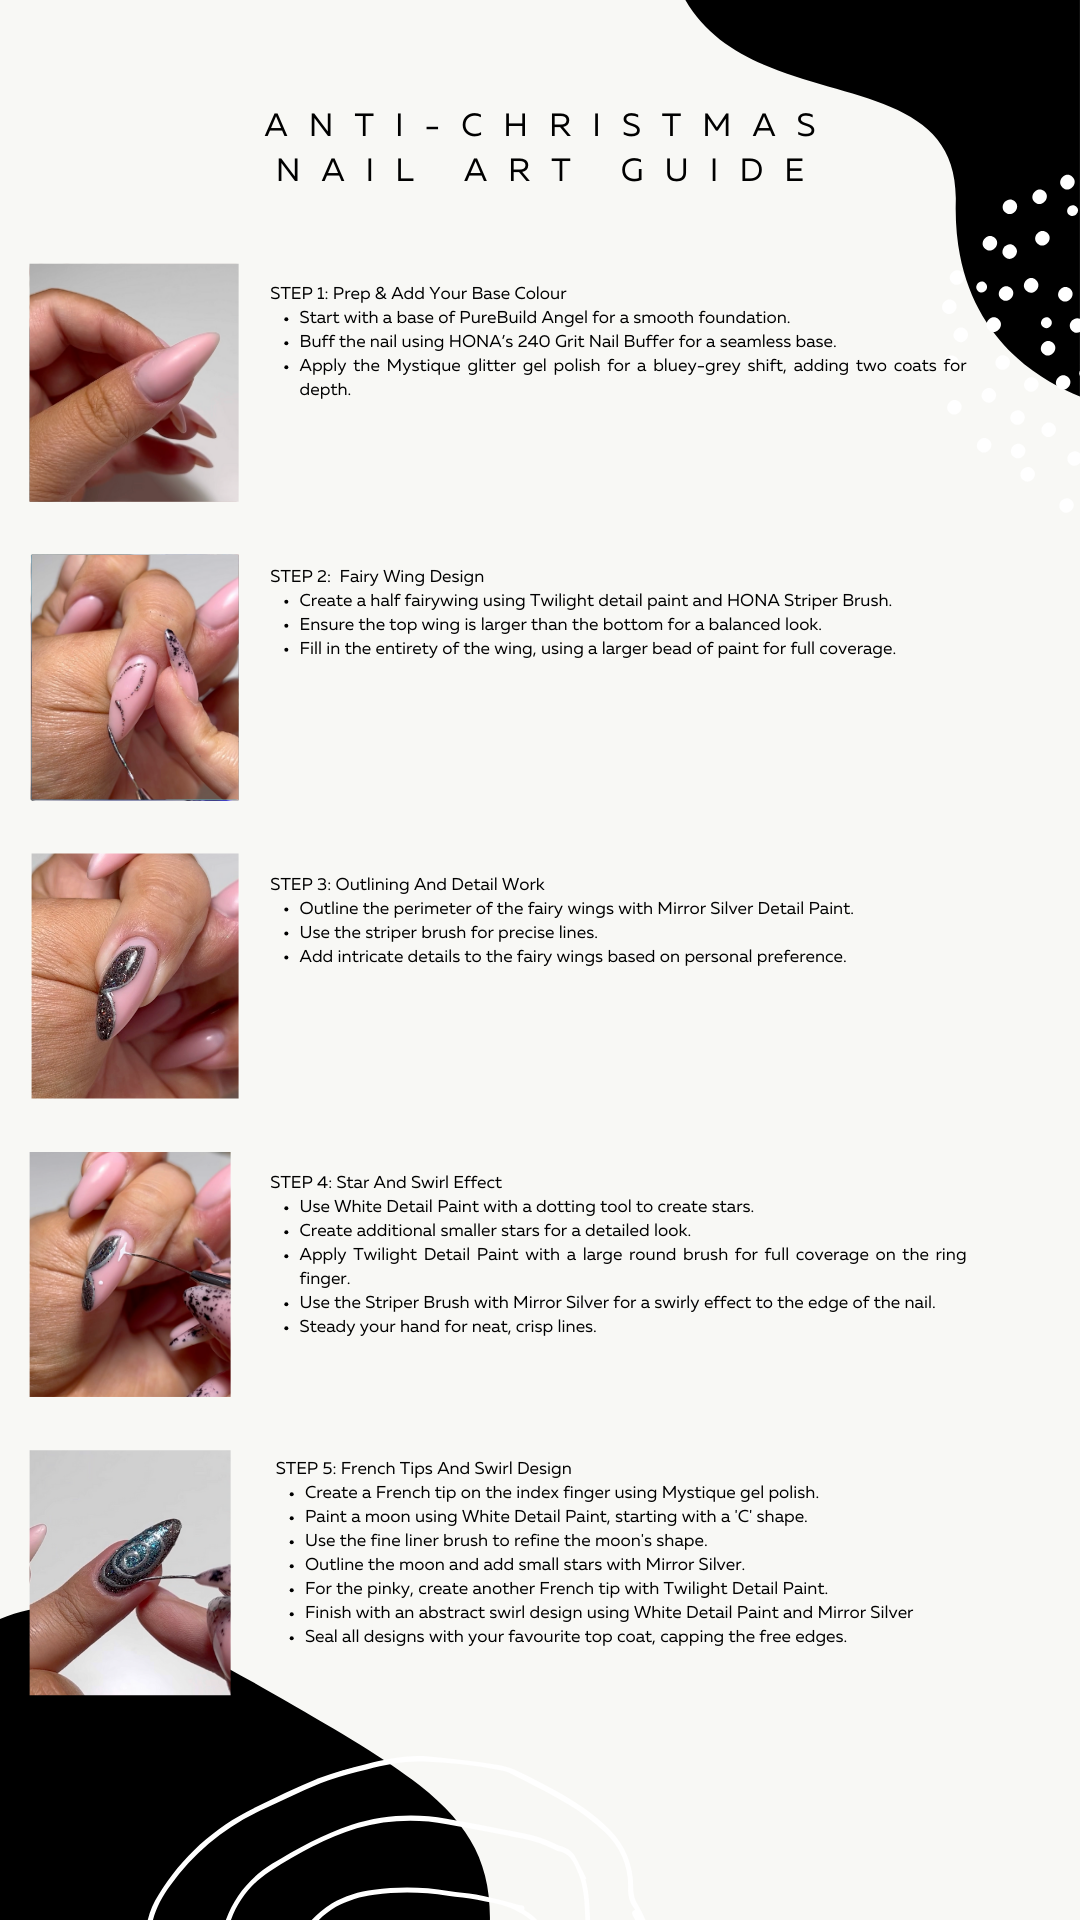
Application Guide
Video Transcript
Hey angels, I'm Morgan and today I'm going to show you how to create this cute mystical nail look using all her new products. To achieve this nail look you're going to need the new Mystique glitter gel polish which has the most beautiful bluey-grey shift to it. And you'll also need the new Twilight detail paint. It is a reflective one and I mean it speaks for itself. To start off, I’ve applied a fresh base of PureBuild Angel and I’ve buffed over the nail with HONA’s 240 Grit Nail Buffer to create a smooth and seamless base for your designs. So to kick off the design, we're going to want to create a half fairywing using Twilight detail paint on HONA Striper Brush. At this stage of the design you want to ensure that the top wing is bigger than the bottom. As you can see now, I'm just filling in the entirety of the wing using the detail paint. And what I'll do is, I'll grab a slightly bigger bead. That way you cover the whole design a whole lot quicker. As you know the detail paints have a more thicker consistency compared to our gel polishes as they are made to create nail art designs with however, I do find with a lot of detail paints, especially they’re that tad bit more thicker. That way by grabbing a bigger bead on your brush, you'll get a more seamless and full coverage finish to your nail art look. So now I'm just outlining the perimeter of the fairy wings using Mirror Silver Detail Paint on my striper brush. As you'll see from this entire set I mainly use the striper brush for everything when I say it is my staple in my nail kit I really do mean it. For the outline work, you want to make sure you have a thin coat of Mirror Silver on your nail art brush, so that way you can get some nice crisp lines. Now we are just filling in any detail work of the fairy wings. This is entirely personal preference on how you imagined them to be. Now we'll just take in the White Detail Paint on a dotting tool to create some stars. Again, you need to use the brush of your preference to create this or use of course the striper brush. Please also excuse the little crab claw position that I've got going on throughout this entire video, you nail techs will know you've gotta be in whatever position that is comfortable to you in any way possible to create a sick nail art look, and this is mine. Now we'll just go in again with our dotting tool, with the White Detail Paint I need to create some baby little stars. This is entirely personal preference and what you want it to look like. So to start off the ring finger design, you're going to want to take Twilight Detail Paint on your large round full coverage brush from HONA of course. And like I said before, you want to make sure you take in that thicker bead so you can get a full coverage nail. Now I'm just taking my Striper Brush with a tiny bit of Twilight Detail Paint on to make sure the cute colour is nice and flush. Now I think this nail is the star of the show and this is exactly why. As you can see I've got one of HONA’s Ombre Sponges, and I've got Mystique gel polish and I'm tapping slowly on the nail you want to make sure you're ombre-ing it but it gives the kind of aura effect. Less is more quite literally with this design. So now we've got Mirror Silver again on a brush of your preference and what we want to do is create a swirly effect all the way to the edge of the nail. As you can see I rest my pinky finger on my hand, that way it stabilises yourself so you can create some neat crisp thin lines. My top tip here to create this design will be to make sure your brush is fully coated in whichever colour you choose to use. Obviously, here we're using Mirror Silver and just go with the flow of the brush. The brush will literally take you in the direction that you need to go. As you can see, I'm just swiping down and it kind of curves at the end. It's perfect, and that's why I'll use the Striper Brush. I think a larger brush in this instance is much better. For the index finger, you're going to want to create a French again you want to make sure you have a sufficient amount on your brush so you get that full coverage French tip. We’re using Mystique gel polish here. As my nail is more almond shape, I much prefer to go from side wall to side wall to create the French however, if you have a square shape now, I'd say go from sidewall to centre and vice versa and then fill it in. Now we're going in with our White Detail Paint to create a moon, I find it easiest to create a C shape first and then fill it in. As you can see I'm going with my liner brush to refine the shape. You want to make sure the edges are more pointy and in the centre it's a bit more chunky. We're going in again with our dotting tool with a tiny bit of Mirror Silver on and then we're taking our fine liner brush to create the star. My best advice to create the star would be to have little to no product on your brush to create thin lines coming from the centre of the star. Now I will just go and use my dotting tool again to create little tiny dots to give the illusion of smaller stars on using White Detail Paint and Mirror Silver to do this for the pinky finger, we'll go in with Twilight Detail Paint to create another French and as I said before, I'm much find it easier to go from sidewall to sidewall do this however you do whatever you find comfortable for yourself. Make sure you're taking that larger bead off your Twilight Detail Paint to make sure you can get a full coverage french. Once you've cured the French, we're gonna go in with our White Detail Paint again, on my striper brush to create a kind of abstract swirl design again. this isn't totally personal preference. This is kind of the design that all came up with, that I just thought was fitting. I like the placement that's near the tip you can do wherever you like. I also liked how it was overlapping the French. This is completely up to you. Now we'll just reform in the edges with minimal product on the brush just to make sure we have crisp lines. Now we're going in again with our sharp brush and mirror silver data pay to create an outline of the walls. He wants to make sure you have a smaller amount of product on your brush as we're only outlining the border of the wall. Now we're just going to have some more mirrors silver on our brush to add a bit of detail into the centre of the wall. This just adds a bit more dimension. And lastly, you just want to use your favourite top coat to encapsulate all of your designs, making sure you're capping the free edge. Obviously, here I'm using super short ball HONA And voila, we're all done. Thank you so much guys for watching, and hope you liked the design. I can't wait to see all your recreations. Bye