For the 8th day of our 12-days of HONA countdown, we’re learning how to create tinsel on your nail art designs. This tutorial has been created by @afterglow.bycarmen using our new advent-calendar-exclusive shade, Juniper Detail Paint. Don't worry If you haven't got the advent calendar, you can still follow along with your closest reflective detail paint.
Watch the Tutorial
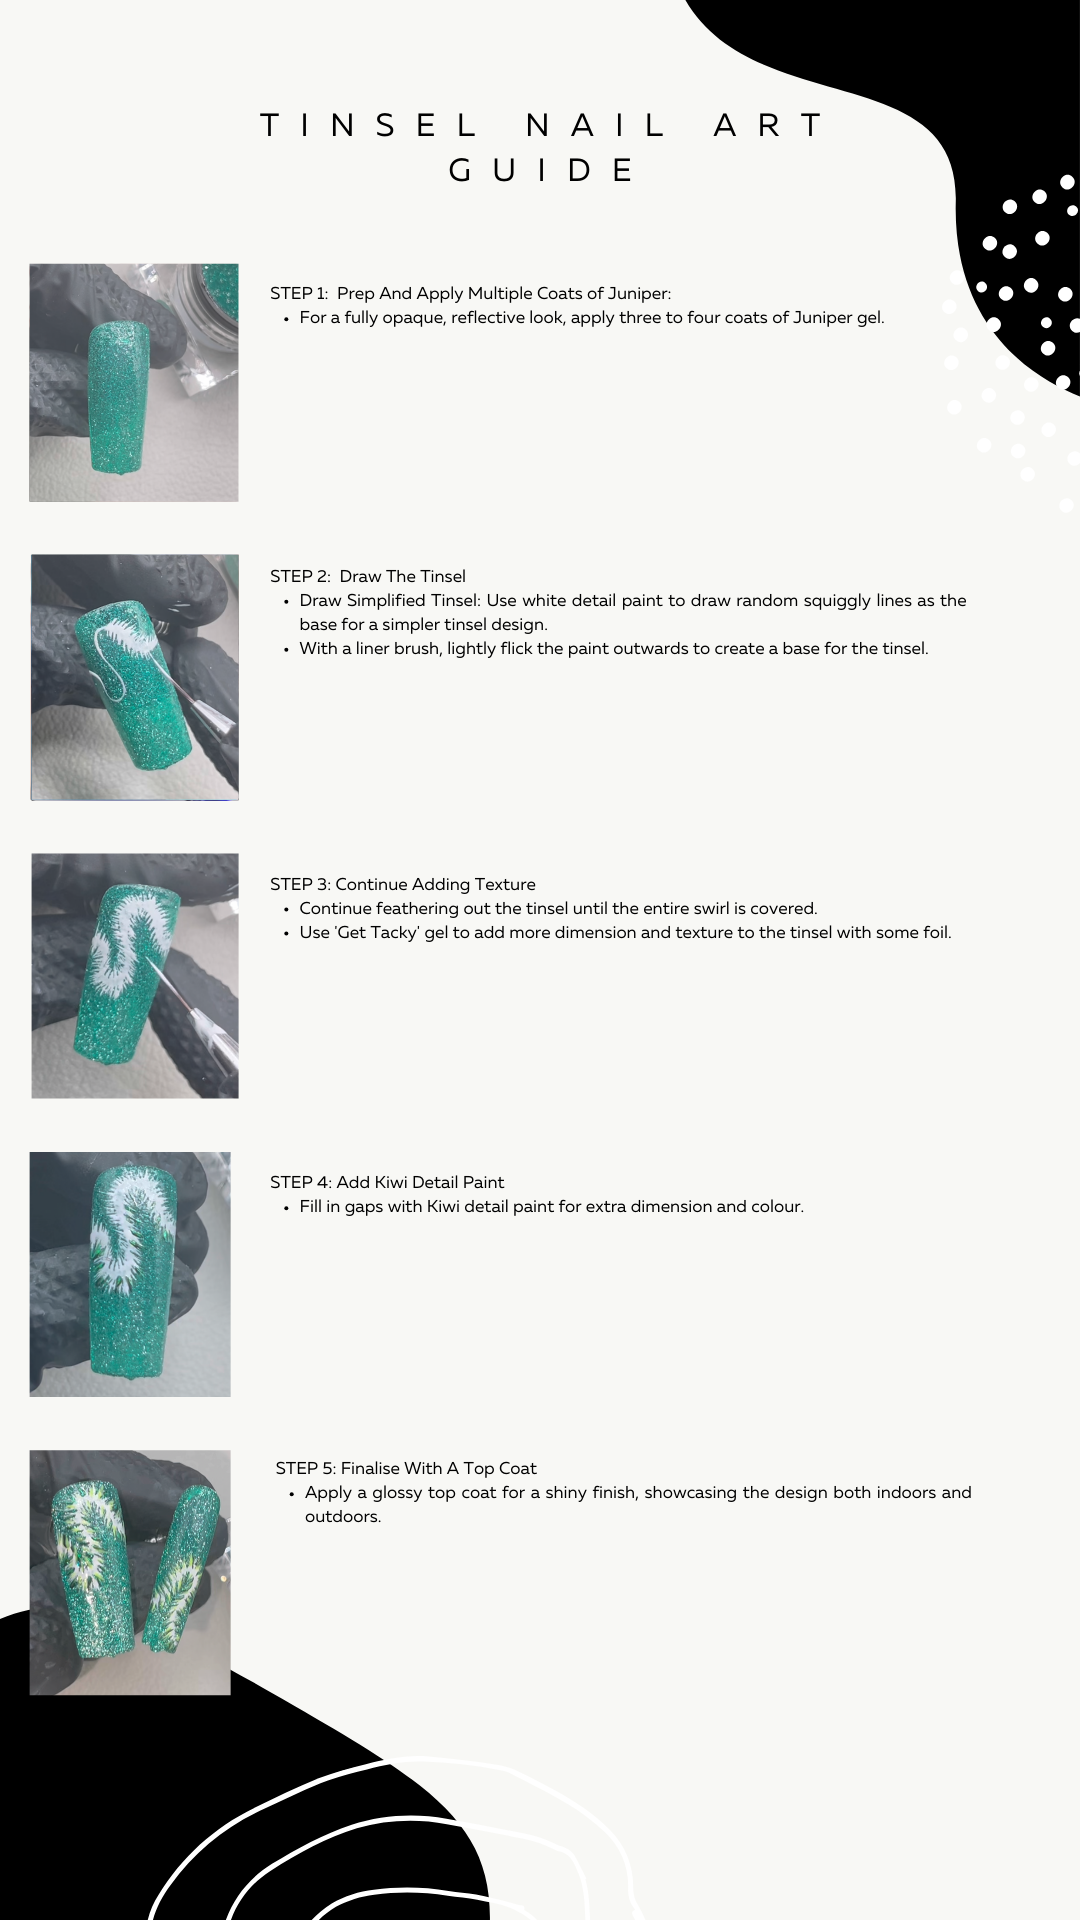
Application Guide
Video Transcript
Hi, everyone. So today I'm going to be showing you a picture of myself. Kidding, I am going to be taking Mr. Grinch Who is kind of my alter ego, but I'm going to be giving him a festive makeover with a brand new look at it. Juniper, which is the new reflective gel from HONA. And how beautiful is it, it's a rich emerald green, which is perfect for the season. Look at the sparkle. Absolutely insane. So I'm really excited to show you my tinsel inspired design to go with this. So Mr. Grinch is pre drawn, as that's not the main focus of what I'm trying to create with you today. Just filling in his tinsel in these little clips here, just with the Juniper gel on its own, I've really feel like this colour is perfect to kind of create a Tinsley effect because of the reflective vibe that it has. Now I'm going to use the black detail paint. And what I'm going to do is do the outline for the tinsel just really make it pop. In this design, I'm going to show you two different ways to draw it in. So this one, I'd probably say it's a little bit more detailed, the other one's a bit more freehand, and I'd say quite easy to turn into a design that your clients can have and love over the festive season. This doesn't have to be nice or perfect in any way. So put your perfectionist side away and just enjoy the messy vibes. I'm going to use the get tacky gel and just draw some little flecks in the tinsel doesn't have to be neat again, but what we're going to use is the green shards foil. And I think they'll add a really nice 3D effect to the tinsel to kind of give it a little bit of reflection and mimic what real tinsel does look like. Of course, I'm out of shot here, but it does show very nicely what I'm trying to explain. So we're going with it. not going to lie it may not be for me, but it works. And the end result is amazing. Just doing the same on this side of the foil as well. There is a little bit of mess, but I've just wiped out to clean it off. And then I'm just re outline and again, I've got some tiny little bits of foil on my black line. And so I've just gone over that made the tinsel a little bit more fluffy. And here he is ready for the festivities. Gorgeous Grinch you shall go to the ball. Okay, onto the rest of the designs. This nail is going to be everything reflective everything juniper. So I have actually done I think three or four coats here. I do love that the gel can be transparent, but I wanted to have a fuller opaque. Now for this specific design just as a good base. Look at the sparkle, anything shiny, I absolutely love it. And this green is the perfect tone. Now we're going to use the white detail paint for the next section. And this is where we're going to start creating the simpler version of tinsel. So as you can see, I'm just drawing a random squiggly line, don't think about it because the end result is what's going to make it amazing doesn't have to be neat. And now I'm using my liner brush with a really light pressure to just flick the paint out so we can get our base for the tinsel. This does not have to be neat at all. So don't overthink it. Just whack that squiggly line on and start to feather it out. This is definitely something you can add to your sets when your clients just want something a little bit festive, but you might be on a time schedule because we all know as now text that we are very busy in this season. And don't even give ourselves time to breathe. So I do think this is something that is quick, easy, but also effective. So I'm just finishing further in both sides here okay, that fluffy tinsel beautiful. So now I'm going back in again with the get tacky, just so I can start to create some dimension and texture to the tinsel. Again, random lines, absolutely whack it on and just get that foil get the shininess and you can see there it starts to create that extra layer of dimension which I really love because when it catches the light, especially against Juniper in the background, it's just going to be a green, shimmery shiny greatness. So just going back in with some more here as well. And just to tie that all together, I'm now going to take key week detail paint, and we're just going to add that into the gaps just to add just an extra bit of dimension. We love a bit of dimension, just some extra colour so that it really stands out, especially on the Juniper background just so it gives that extra pop. And you can do as much as you want as little as you want. I feel like with designs like this, they're very fluid so it's just really taking a look at it and knowing when you're happy with it. Obviously it will also depend on the size of the know you're working on. And then Here they are, I matched the pinkie to it. And how amazing does that look at the flash love it. So I've got one nail left in the design before I start to add all my extras. So I'm going to take the same base that I've used for the rest of the set, which is the juicy gels lime sorbet, I think I've done about three coats for this. I actually love how sheer they are with just one comb. But I just wanted to add a little bit more green Opacity just because I'm using press ons and I wanted to make sure that it covered my actual nail underneath. So going in with cherry, I'm now going to actually create a little sign because I decided I wanted my Grinch to be outside on route to the Christmas do. So yeah, I'm just going to draw a little sign here. I have sped it up because I know it's not the main part of the tutorial that I'm trying to go with. But I did want to show how I could put a whole set together and just really develop it as I go along. I've actually custom mixed the brown purely because I don't own mahogany or Seville off the website so you could use those. But I've mixed kiwi and cherry together and I think it's still made quite a nice colour. And in in that mix, I've actually added black just so I can create these darker brown tones as well. Just going to outline that so that it really stands out against the background and now I'm taking the white detail paint again and I'm just writing Whoville to be honest with the font for this, I just drew it as teeny tiny as I could and just made sure that it was thick enough to read it. There wasn't a specific font that I was following, but I do like that the white stands out on the cherry background. And then just a little bit more detailing I added white back into one of the custom mixes that I made earlier for the browns. And now we're at the part of the tutorial where you will see that I just don't know when to stop and just have to keep adding into every little space that I can. So now the sign is going to have some Juniper mistletoe, I did want to add a little bit of the green simmer on that nail just so it could have an extra pop. And of course I'm going to draw some more mistletoe even though we supposed to be outside but now there's just mistletoe randomly outside in the sky. So he's going to stand under that I'm just going to fill that in with cherry for the little berries and then Juniper again for the extra pzazz Sparkle, shimmery shiny goodness. And I'm just outlining that again just so I can really make that pop because I did go over some of the lines a little bit but that's okay, we can fix it easily. And here she goes again, add in more things just to tie the look together. I'm just using the white detail paint to draw some snow falling from the sky because he is outside. So yeah, that is basically the end of the design and then I'm just going to show you a lovely top coat video and a few clips I got of the set wearing it inside and outside so enjoy Ooh, so shiny and glossy. I literally love a top coat video i dont know about anyone else but I just love seeing the gloss high shine. Absolutely massive Yes. Oh, how can you and for a former Grinch myself, I must say I do actually like this design and I love how it's come out. I really love how Juniper is still the star of the show. Even a detailed set. You literally can't miss that. I am obsessed Juniper literally looks amazing inside outside natural light, artificial light. It's just that colour. And yeah, it's essential. I really hope you've enjoyed the tutorial and thank you so much for watching. See you later.